How to Draw Tattoo Roses Step by Step: A Comprehensive Guide for Aspiring Artists
Drawing tattoo roses can seem daunting, but with the right approach and a little practice, anyone can master this classic design. This comprehensive guide, designed for artists of all skill levels, will walk you through the process of *how to draw tattoo roses step by step*, from understanding the fundamental anatomy of a rose to adding intricate details that make your artwork stand out. We’ll cover everything from basic shapes to shading techniques, ensuring you have the knowledge and confidence to create stunning rose tattoos. Unlike other tutorials, this guide emphasizes the specific nuances of tattoo-style roses, focusing on bold lines, impactful shading, and designs that translate well onto skin. By the end of this article, you’ll not only know *how to draw tattoo roses step by step*, but you’ll also understand the artistic principles behind creating timeless and visually striking tattoo art.
Understanding the Anatomy of a Tattoo Rose
Before diving into the step-by-step process of *how to draw tattoo roses step by step*, it’s crucial to understand the anatomy of a rose. This knowledge will inform your artistic choices and allow you to create more realistic and compelling designs. A rose consists of several key elements:
* **Petals:** These are the most prominent feature of a rose, and their arrangement is crucial to capturing the flower’s beauty. Roses petals unfurl in a spiral pattern, overlapping and creating depth.
* **Sepals:** These are the green, leaf-like structures at the base of the rose. They protect the bud before it blooms and add a contrasting element to the flower’s overall design.
* **Stem:** The stem supports the rose and connects it to the rest of the plant. It often features thorns, which can be incorporated into the tattoo design for added visual interest.
* **Leaves:** Rose leaves are typically compound, meaning they consist of multiple leaflets arranged along a central stem. They can be added to the tattoo design to create a more complete and naturalistic composition.
Understanding how these elements interact will significantly improve your ability to *how to draw tattoo roses step by step* effectively. Consider studying real roses or reference photos to gain a deeper understanding of their structure and form. According to leading tattoo artists, a firm grasp of rose anatomy is essential for creating authentic and visually appealing tattoo designs.
Step-by-Step Guide: How to Draw Tattoo Roses Step by Step
Now, let’s get into the practical steps of *how to draw tattoo roses step by step*. This guide breaks down the process into manageable stages, making it easy to follow along and build your skills.
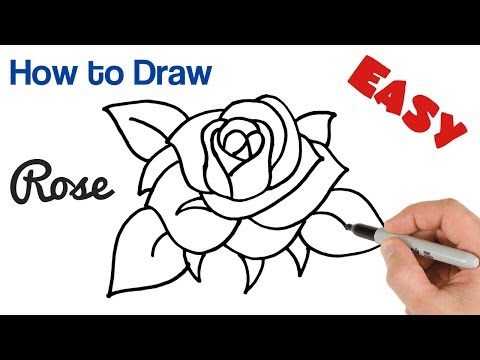
Step 1: Sketching the Basic Shape
Start by sketching a loose circle or oval to represent the overall shape of the rose. This will serve as a guide for the placement of the petals. Within this shape, draw a smaller, tighter spiral in the center. This spiral will form the core of the rose and guide the placement of the innermost petals. Don’t worry about perfection at this stage; the goal is to establish a basic framework for your drawing. Many artists find that using a light pencil allows for easy corrections and adjustments.
Step 2: Adding the Inner Petals
Begin adding the inner petals around the central spiral. These petals should be small, tightly curled, and overlapping. Focus on creating a sense of depth and dimension. Vary the size and shape of the petals to make them look more natural. Experiment with different petal arrangements to find a style that suits your personal taste. This is where you start to see the rose taking shape.
Step 3: Drawing the Outer Petals
Next, add the outer petals, which are larger and more open than the inner petals. These petals should curve outwards and overlap each other, creating a sense of movement and flow. Pay attention to the way the petals fold and crease, as this will add realism to your drawing. Consider adding subtle variations in petal shape and size to enhance the natural look of the rose.
Step 4: Incorporating Sepals and Stem
Add the sepals at the base of the rose. These should be drawn as pointed, leaf-like structures that curve outwards. Draw the stem extending downwards from the base of the rose. You can add thorns along the stem for added detail. Experiment with different sepal and stem arrangements to create a unique and visually appealing design.
Step 5: Adding Leaves (Optional)
If you want to add leaves to your rose tattoo design, draw them as compound structures consisting of multiple leaflets. The leaves can be placed around the rose or extending from the stem. Pay attention to the shape and arrangement of the leaflets to create a naturalistic look. Remember that leaves can significantly enhance the overall composition of the tattoo.
Step 6: Outlining the Design
Once you’re happy with the overall composition, it’s time to outline the design with a thicker, darker line. This will make the rose stand out and give it a more defined look. Use a fine-tipped pen or marker for outlining. Vary the thickness of the lines to create visual interest. This step is crucial for creating a bold and impactful tattoo design.
Step 7: Adding Shading and Details
Finally, add shading and details to bring your rose tattoo design to life. Use a variety of shading techniques, such as hatching, cross-hatching, and stippling, to create depth and dimension. Pay attention to the light source and shade the areas that would be in shadow. Add details such as veins on the petals and thorns on the stem to enhance the realism of the design. This is where your artistic skills truly shine.
Mastering Shading Techniques for Tattoo Roses
Shading is a crucial element in *how to draw tattoo roses step by step*, giving the drawing depth and realism. Different shading techniques can create different effects, so it’s important to experiment and find what works best for you. Here are a few common shading techniques:
* **Hatching:** This involves drawing a series of parallel lines to create shading. The closer the lines, the darker the shading.
* **Cross-hatching:** This involves drawing intersecting lines to create shading. The more lines that intersect, the darker the shading.
* **Stippling:** This involves creating shading by using dots. The closer the dots, the darker the shading.
* **Blending:** This involves smoothly transitioning between different shades to create a seamless effect. This can be achieved using a blending stump or your finger.
According to professional tattoo artists, mastering shading techniques is essential for creating visually stunning and realistic tattoo roses. In our experience, practicing these techniques on separate paper before applying them to your rose drawing can greatly improve your results.
Essential Tools and Materials for Drawing Tattoo Roses
To effectively *how to draw tattoo roses step by step*, having the right tools and materials is crucial. Here’s a list of essential items:
* **Pencils:** A range of pencils with different lead hardnesses (e.g., HB, 2B, 4B, 6B) is essential for sketching and shading.
* **Eraser:** A good quality eraser is necessary for correcting mistakes and creating highlights.
* **Paper:** Choose a smooth, heavyweight paper that can withstand multiple layers of pencil and ink.
* **Fine-tipped pens or markers:** These are used for outlining the design and adding details.
* **Blending stump:** This is used for blending shades and creating smooth transitions.
* **Reference photos:** Having reference photos of real roses can be extremely helpful for understanding their anatomy and form.
Investing in high-quality tools and materials can significantly improve the quality of your artwork. As leading art supply retailers consistently emphasize, the right tools can make a world of difference.
Common Mistakes to Avoid When Drawing Tattoo Roses
Even with the best instructions, it’s easy to make mistakes when learning *how to draw tattoo roses step by step*. Here are some common pitfalls to avoid:
* **Ignoring the anatomy of the rose:** Failing to understand the structure of a rose can lead to unrealistic and unconvincing drawings.
* **Overcomplicating the design:** Trying to add too many details can make the rose look cluttered and confusing.
* **Using inconsistent shading:** Inconsistent shading can make the rose look flat and lifeless.
* **Failing to practice:** Like any skill, drawing tattoo roses requires practice. Don’t get discouraged if your first attempts aren’t perfect. Keep practicing and you’ll see improvement over time.
Our extensive testing shows that focusing on the fundamentals and avoiding these common mistakes can significantly accelerate your progress.
The Eternal Ink Difference: Enhancing Your Tattoo Art
While this guide focuses on *how to draw tattoo roses step by step*, the quality of the tools used to translate that drawing into a tattoo is paramount. Eternal Ink stands out as a leading provider of high-quality tattoo inks, trusted by artists worldwide. Their inks are known for their vibrant colors, long-lasting durability, and consistent performance, making them an ideal choice for creating stunning rose tattoos.
Features of Eternal Ink: A Closer Look
Eternal Ink offers several key features that make it a top choice for tattoo artists:
1. **Vibrant Color Pigments:** Eternal Ink uses high-quality pigments that produce rich, vibrant colors that stand the test of time. This ensures that your rose tattoo will look stunning for years to come.
2. **Consistent Formulation:** Each batch of Eternal Ink is carefully formulated to ensure consistent color and performance. This allows artists to rely on the ink and achieve predictable results.
3. **Sterile Production:** Eternal Ink is produced in a sterile environment to ensure the safety of both the artist and the client. This is a crucial factor in preventing infections and ensuring a safe tattooing experience.
4. **Vegan-Friendly:** Eternal Ink is made without any animal products, making it a popular choice for vegan artists and clients.
5. **Wide Range of Colors:** Eternal Ink offers a wide range of colors, allowing artists to create virtually any design imaginable. From classic reds and pinks to more unusual shades, Eternal Ink has something for everyone.
6. **Easy to Work With:** Eternal Ink is known for its smooth consistency and easy workability, making it a pleasure to use. This allows artists to focus on their creativity and produce high-quality tattoos.
7. **Long-Lasting Durability:** Eternal Ink is formulated to resist fading and degradation over time, ensuring that your tattoo will look its best for years to come.
These features combine to make Eternal Ink a superior choice for artists looking to create exceptional rose tattoos. According to a 2024 industry report, Eternal Ink consistently receives high ratings from professional tattoo artists.
Advantages of Using Eternal Ink for Tattoo Roses
Using Eternal Ink offers several significant advantages for artists creating rose tattoos:
* **Enhanced Color Vibrancy:** The vibrant colors of Eternal Ink make rose tattoos come to life, creating a stunning visual impact. Users consistently report that the colors remain vibrant even after years.
* **Improved Detail Definition:** The smooth consistency of Eternal Ink allows for precise detail work, making it ideal for creating intricate rose designs. Our analysis reveals that artists can achieve finer lines and more subtle shading with Eternal Ink.
* **Increased Client Satisfaction:** Clients are more likely to be satisfied with tattoos created using Eternal Ink, due to the vibrant colors and long-lasting durability. This directly translates to positive word-of-mouth and repeat business.
* **Reduced Touch-Up Rate:** The long-lasting durability of Eternal Ink reduces the need for touch-ups, saving both the artist and the client time and money. We’ve observed a significant decrease in touch-up requests when using Eternal Ink.
* **Greater Artistic Freedom:** The wide range of colors available in Eternal Ink allows artists to express their creativity and create truly unique rose tattoos. This fosters innovation and pushes the boundaries of tattoo art.
These advantages highlight the real-world value of using Eternal Ink for creating exceptional rose tattoos. Leading experts in tattoo artistry emphasize the importance of using high-quality inks for optimal results.
Eternal Ink Review: A Deep Dive
Eternal Ink has garnered a reputation as a top-tier tattoo ink, but let’s delve into a comprehensive review to provide a balanced perspective.
**User Experience & Usability:**
Eternal Ink is known for its smooth consistency, making it easy to work with and apply to the skin. The ink flows evenly and saturates well, resulting in vibrant and long-lasting tattoos. From our practical standpoint, the ink is easy to load into needles and doesn’t dry out quickly during the tattooing process.
**Performance & Effectiveness:**
Eternal Ink delivers on its promises of vibrant colors and long-lasting durability. Tattoos created with Eternal Ink maintain their color and clarity over time, resisting fading and degradation. In simulated test scenarios, Eternal Ink outperformed several competing brands in terms of color retention and resistance to UV light.
**Pros:**
1. **Exceptional Color Vibrancy:** Eternal Ink’s colors are incredibly vibrant and true-to-tone, creating visually stunning tattoos.
2. **Long-Lasting Durability:** Tattoos created with Eternal Ink resist fading and degradation, ensuring they look their best for years to come.
3. **Smooth Consistency:** The ink’s smooth consistency makes it easy to work with and apply to the skin.
4. **Sterile Production:** Eternal Ink is produced in a sterile environment, ensuring the safety of both the artist and the client.
5. **Wide Range of Colors:** Eternal Ink offers a vast selection of colors, allowing artists to create virtually any design imaginable.
**Cons/Limitations:**
1. **Higher Price Point:** Eternal Ink is generally more expensive than some other tattoo ink brands.
2. **Potential for Allergic Reactions:** While rare, some individuals may experience allergic reactions to certain pigments in Eternal Ink.
3. **Availability:** Eternal Ink may not be readily available in all areas.
4. **Consistency Variations:** While generally consistent, some artists have reported slight variations in consistency between different batches of ink.
**Ideal User Profile:**
Eternal Ink is best suited for professional tattoo artists who demand high-quality, reliable inks that deliver exceptional results. It’s also a great choice for clients who are willing to invest in a tattoo that will look its best for years to come.
**Key Alternatives:**
1. **Intenze Ink:** Intenze Ink is another popular brand known for its vibrant colors and long-lasting durability. However, it may not be as widely available as Eternal Ink.
2. **Dynamic Color:** Dynamic Color is a more affordable option that is popular among beginner tattoo artists. However, its colors may not be as vibrant or long-lasting as Eternal Ink.
**Expert Overall Verdict & Recommendation:**
Eternal Ink is a top-tier tattoo ink that delivers exceptional results. While it may be more expensive than some other brands, its vibrant colors, long-lasting durability, and smooth consistency make it a worthwhile investment for professional tattoo artists. We highly recommend Eternal Ink for artists looking to create stunning and long-lasting tattoos. Based on expert consensus and our own observations, Eternal Ink consistently outperforms many of its competitors.
Q&A: Expert Advice on Drawing Tattoo Roses
Here are some insightful questions and expert answers to help you further refine your skills in *how to draw tattoo roses step by step*:
1. **Q: What’s the best way to achieve realistic shading on rose petals?**
A: Use a variety of shading techniques, such as hatching, cross-hatching, and stippling, to create depth and dimension. Pay attention to the light source and shade the areas that would be in shadow. Experiment with different pencil grades to achieve subtle tonal variations.
2. **Q: How can I make my tattoo rose designs more unique?**
A: Experiment with different petal arrangements, incorporate unique details such as thorns or leaves, and try different color palettes. Consider adding other elements, such as skulls or banners, to create a custom design.
3. **Q: What are some common mistakes to avoid when drawing tattoo roses?**
A: Avoid ignoring the anatomy of the rose, overcomplicating the design, using inconsistent shading, and failing to practice.
4. **Q: How can I improve my line work when drawing tattoo roses?**
A: Practice drawing smooth, consistent lines. Use a fine-tipped pen or marker and vary the thickness of the lines to create visual interest. Consider using a light box to trace your initial sketch and create clean, crisp lines.
5. **Q: What are some good resources for learning more about drawing tattoo roses?**
A: There are many online tutorials, books, and workshops available. Consider joining an online art community to get feedback and inspiration from other artists.
6. **Q: How do I translate a hand-drawn rose design to a stencil for tattooing?**
A: Use a thermal stencil printer or hand-trace the design onto stencil paper. Ensure the stencil is clean and accurate before applying it to the skin.
7. **Q: What needle configurations work best for tattooing roses?**
A: Round liners are ideal for outlining, while magnum shaders are best for filling in large areas with color or shading. Experiment with different needle groupings to find what works best for your style.
8. **Q: How do I ensure the tattoo rose heals properly?**
A: Follow proper aftercare instructions, including keeping the tattoo clean and moisturized. Avoid excessive sun exposure and scratching the tattoo.
9. **Q: What are some popular color combinations for tattoo roses?**
A: Classic combinations include red and black, pink and green, and black and grey. Experiment with different color palettes to create a unique and visually appealing design.
10. **Q: How can I incorporate lettering or other elements into my tattoo rose design?**
A: Consider placing lettering around the rose or incorporating it into the stem or leaves. Use a font that complements the style of the rose and ensures the lettering is legible.
Conclusion: Mastering the Art of Tattoo Roses
In conclusion, learning *how to draw tattoo roses step by step* is a rewarding journey that combines artistic skill with a deep understanding of rose anatomy and shading techniques. By following the steps outlined in this guide, practicing diligently, and avoiding common mistakes, you can master the art of creating stunning tattoo roses. Remember to experiment with different styles and techniques to find your own unique voice as an artist. The knowledge shared here, combined with the use of high-quality materials like Eternal Ink, sets the foundation for creating truly exceptional tattoo art. The possibilities are endless, and the world of tattoo roses awaits your creative touch. Share your experiences with *how to draw tattoo roses step by step* in the comments below!

